procedure. If you have an older machine not capable of booting off the CD-ROM, you will
need to use a boot disk and start the procedure from there.
Creating a Boot Disk
Once Windows has started and the CD-ROM is in the appropriate drive, open an MS-DOS
Prompt window (Start | Program Menu | MS-DOS Prompt), which will give you a command
shell prompt. Change over to the CD-ROM drive letter and go into the dosutils directory.
There you will find the rawrite.exe program. Simply run the executable; you will be prompted
for the source file and destination floppy. The source file will be on the same drive and is called /images/boot.img.
You can find more detail on this process at http://www.redhat.com/docs/manuals/linux/
RHL-8.0-Manual/install-guide/s1-steps-install-cdrom.html.
Starting the Installation
To begin the installation process, boot off the CD-ROM. This will present you with a splash
screen introducing you to Red Hat 8.0. At the bottom of the screen will be a prompt that reads
boot:
If you do not press any key, the prompt will automatically time out and begin the graphical
installation process. You can press ENTER to start the process immediately.
If you don’t have a mouse, or if the installer cannot find yours, you will be presented with
a screen that asks whether you want to use the text mode installation or you want to help the
installer figure out what kind of mouse you have. Use the TAB key to select which choice you
want, and press ENTER to continue. If you proceed with the text mode, you will find that the
basic steps to the installation are similar to those for the graphical interface, and you should be
able to follow along with this installation guide. If you need additional help, you can visit Red
Hat’s help page for the text-mode installation at http://www.redhat.com/docs/manuals/linux/
RHL-8.0-Manual/install-guide/s1-guimode-textinterface.html.
Welcome to Red Hat Linux
The installer’s first graphical screen welcomes you to Red Hat Linux (see Figure 2-1). The
interface works much like any other GUI interface. Simply point to your selection and click.
Notice that context-sensitive help appears on the left side of the screen. If you don’t want
to see it, you can click the Hide Help button at the lower-left part of the screen. The Back
button in the lower right of the screen is grayed out at this point, because there have been no
prior options to select.
This screen isn’t very challenging: there aren’t any choices to be made. When you are
ready to continue, click the Next button in the lower-right portion of the screen.
Choosing a Language
The first menu will ask which language you want to use to continue the installation process
(see Figure 2-2). Once you have chosen the desired language, click Next to continue.
 Figure 2-1 The first installer screen welcomes you to Red Hat Linux.
 Figure 2-2 Select the language to be used during installation.
Selecting a Keyboard Type
This next menu enables you to select what kind of keyboard you have. For most people,
the keyboard type will be selected according to language and geography (see Figure 2-3).
A Dvorak keyboard layout may be selected here if you prefer it. When you are done, click Next to continue, or click Back to go back to the language selection menu.
 Figure 2-3 Select the preferred keyboard layout.
Selecting a Mouse
You now can select the type of mouse you want to use with the X Window environment. More
than likely, the autoprobe will have been able to identify what kind of mouse you have.
If you need to help Linux, simply pick your mouse type from the top menu box (see
Figure 2-4). The Generic settings work well in most cases, but you can scroll through the list
of manufacturers and look for the maker of your particular mouse. Click on the triangle to the
left of the vendor’s name to open a new level of choices for that particular brand.
If you have a serial mouse, you will also need to select the serial port it is using, which
you can do in the lower box of the screen.
If you have a two-button mouse, click Emulate 3 Buttons at the bottom of the screen,
because some features of the X Window environment work with a three-button mouse only.
The emulation allows you to click both buttons of a two-button mouse to simulate the third
(middle) button.
 Figure 2-4 Select the mouse description that most closely matches your hardware.
Installation Type
With the language and input devices selected, you are now ready to begin the actual installation
phase of Red Hat Linux. You will see a screen that lets you pick how you want to install Red
Hat Linux. If you are on an upgrade path, this selection is easy—simply click Upgrade and
then click Next. You’ll see some screens informing you of what is being currently upgraded.
This module assumes that you’re doing a clean installation. This will wipe all the existing
contents of the disk before freshly installing Red Hat 8.0.
Note that under the Install button is an option to install Linux in a Server configuration
(see Figure 2-5). This method has all of the packages selected for you, as well as a disk partitioning scheme. While that can be a fine starting point for playing with Linux, for this
module, you want to choose Custom so that you can fine-tune what you install and how you
configure it.
Creating Partitions for Linux
Since you selected the custom installation, you will need to create partitions for Linux to
install on. If you are used to the Windows installation process, you will find that this process
is a little different from how you partition Windows into separate drives.
In short, each partition is mounted at boot time. The mount process makes the contents of
that partition available as if it were just another directory on the system. For example, the root

 Figure 2-5 For this module, perform a Custom installation of Red Hat Linux.
directory (/) is the topmost directory in the structure. In a simple configuration (for example, the one performed when you choose the Automatically Partition option in a custom installation),
the system’s entire directory structure will be created on a single partition. More complicated
configurations make more sense in most cases. For example, a standard Linux subdirectory
called /usr will exist in the root directory, but it will have nothing in it. A separate partition
can then be mounted such that going into the /usr directory will allow you to see the contents
of the newly mounted partition (see Figure 2-6).
Since all of the partitions, when mounted, appear as a unified directory tree rather than
as separate drives, the installation software does not differentiate one partition from another.
All it cares about is into which directory each file goes. As a result, the installation process
automatically distributes its files across all the mounted partitions, as long as the mounted
partitions represent different parts of the directory tree where files are usually placed. Under
Linux, the most significant grouping of files is in the /usr directory, where all of the actual
programs reside. (In Windows terms, this is similar to C:\Program Files.) Because you are configuring a server, you need to be aware of the additional large groupings of files that will exist over the life of the server. They are:
● /usr, where all of the program files will reside (similar to C:\Program Files).
● /home, where everyone’s home directory will be (assuming this server will house them).
This is useful for keeping users from consuming an entire disk and leaving other critical
components without space (such as log files).
● /var, the final destination for log files. Because log files can be affected by outside users
(for instance, individuals visiting a web site), it is important to partition them off so that no
one can perform a Denial of Service (DoS) attack by generating so many log entries that
the entire disk fills up.

 Figure 2-6 The contents of the /usr directory can be mounted on a separate partition from the
root directory.
● /tmp, where temporary files are placed. Because this directory is designed so that it is
writable by any user (similar to the C:\Temp directory under Windows), you need to
make sure arbitrary users don’t abuse it and fill up the entire disk; you ensure this by
keeping it on a separate partition.
● Swap. This isn’t a user-accessible file system, but it is where the virtual memory file is
stored. Although Linux (and other UNIXs, as well) can use a normal disk file to hold
virtual memory the way Windows does, you’ll find that having it on its own partition
improves performance.
Now you see why it is a good idea to create multiple partitions on a disk rather than a
single large partition, which you may be used to doing under Microsoft Windows. As you
become more familiar with the hows and whys of partitioning disks under Linux, you may
choose to go back to a single large partition. At that point, of course, you will have enough
knowledge of both systems to understand why one may work better for you than the other.
Now that you have some background on partitioning under Linux, let’s go back to the
installation process itself. The installation screen gives you three options (see Figure 2-7):
automatically partition the disk, manually partition the disk with Disk Druid, or manually
partition the disk with fdisk.
 Figure 2-7 Hard disk partitions can be configured automatically, or manually using Disk
Druid or fdisk.
You don’t want to use the first option, because you want tight control over how the disk
gets allocated in a server environment. And while using fdisk is extremely powerful, it can
also be a bit daunting at first. (Don’t worry: it is covered in Module 7.) So this leaves you with
Disk Druid. Simply select Disk Druid and click Next. This will take you to Figure 2-8.
The Disk Druid partitioning tool was developed by Red Hat as an easy way to create
partitions and associate them to the directories as which they will be mounted. When starting
Disk Druid, you will see a graphical representation of the disk’s partition layout, as well as
detail on all of the existing partitions on your disk. Each partition entry will show the
following information:
● Device Linux associates each partition with a separate device. For the purpose of
installation, you need to know only that under IDE disks, each device begins with
/dev/hdXY. Here, X is either:
● a for IDE Master on the first chain
● b for IDE Slave on the first chain
● c for IDE Master on the second chain
● d for IDE Slave on the second chain
 Figure 2-8 The Disk Druid starts by displaying the existing disk partitions.
Y is the partition number of the disk. For example, /dev/hda1 is the first partition on the
primary chain, primary disk. SCSI follows the same basic idea, except instead of starting
with /dev/hd, each partition starts with /dev/sd and follows the format /dev/sdXY, where X
is a letter representing a unique physical drive (a is for SCSI id 1, b is for SCSI id 2, and
so on). The Y represents the partition number. Thus /dev/sdb4 is the fourth partition on the
SCSI disk with id 2. The system is a little more complex than Windows, but each partition’s
location is explicit—no more guessing, “What physical device does E: correspond to?”
● Mount point The location where the partition is mounted. Initially, this should not
contain any entries.
● Type The partition’s type. Red Hat Linux’s default type is ext3, but Disk Druid also
understands many others, including FAT, FAT32, and NTFS.
● Format Indicates whether the partition will be formatted before Linux installation.
● Size Partition size in MB.
● Start Partition’s initial cylinder number.
● End Partition’s ending cylinder number.
In the middle of the screen are the buttons for controlling what you do with Disk Druid.
These buttons are:
● New Create a new partition.
● Edit Change the parameters on the highlighted partition.
● Delete Delete the highlighted partition.
● Reset Undo all of the changes you’ve made to the partition table but have not committed to.
● RAID Use this button to create a partition in which data is distributed among multiple
drives. This can be useful for increasing disk read performance or providing data redundancy.
While this installation guide does not cover RAID installations, Red Hat provides extensive
information on RAID concepts and configuration at http://www.redhat.com/docs/manuals/
linux/RHL-8.0-Manual/custom-guide/ch-raid-intro.html.
● LVM The Logical Volume Manager (LVM) approach to disk space allocation is
designed to make resizing the system’s disk space easier on the fly. Configuring LVM is
beyond the scope of this guide, but more information is available at http://www.redhat.com/
docs/manuals/linux/RHL-8.0-Manual/custom-guide/ch-lvm.html.
● Next Commit all changes to disk.
● Back Abort all changes made using Disk Druid and exit the program.
Sizing Partitions: The exact amount of space you allocate to each partition depends on
how much space you have and what you plan to do with it. All the same, there are some basic
guidelines for sizing partitions in Red Hat Linux 8.0. If you install all the partitions suggested
in this module, the basic sizing parameters look like this:
 Adding a Partition: To create a new partition, click New. This will bring up a dialog box
where each of the elements in the dialog box should resemble those in Figure 2-9:
● Mount Point The directory where you want this partition to be automatically mounted
at boot time.
● File System Type The type of partition that will reside on that disk. By default, you will
want to select ext3 except for the swap partition (which should be of type “swap”).
● Allowable Drives Specifies onto which drives the partition can be created.
● Size (MB) The size of the partition in megabytes.
● Additional Size Options If you know the exact size you wish to make the partition,
select Fixed Size. The second option allows you to instead set a maximum size, while the
last option allows Disk Druid to make the partition as large as possible.
● Force to be a primary partition If this box is checked, the partition being added cannot
be an “extended” partition. You are unlikely to have a reason to set this option; let Disk
Druid configure the disk partition details.
● Check for bad blocks If you have an old or questionable hard disk, it’s worth setting
this option, but it takes much longer to format the partition if you do. Once you are done
entering all of the information, click OK to continue.
 Figure 2-9 Add a new partition using Disk Druid.
At a minimum, you need to have two partitions: one for holding all of the files and the other
for swap space. Swap space is usually sized to be double the available RAM if there are fewer
than 128MB of RAM, or the same size as the amount of RAM if there are more than 128MB.
Ideally, you will want to separate partitions for /usr, /var, /home, and /tmp in addition to a
root partition. Obviously, you can adjust this equation according to the purpose of the server.
Other Partition Manipulation Tasks : Once you have gone through the steps of adding a partition, and you are comfortable with the variables involved (mount points, sizes, types, devices, and so on), the actual process of editing and deleting partitions is quite simple. Editing an entry means changing the exact same entries that you established when you added the partition, and deleting an entry requires only that you confirm that you really want to perform the deletion.
After you have configured the partitions and mount points as you want them, click Next to continue.
Installing the Boot Loader
GRUB is the default boot manager for Red Hat Linux 8.0. If you aren’t already familiar with
what it does, a boot manager handles the process of actually starting the load process of an operating system. If you’re familiar with Windows NT, you have already dealt with the NT
Loader (NTLDR), which presents the menu at boot time, allowing you to select whether you
want Windows NT or Windows NT (VGA only). You may also have run across NTLDR if
you’ve set up a Windows machine in a dual boot configuration. GRUB performs the same
function for Linux systems.
The Red Hat tool’s screen for setting up GRUB has three sections (see Figure 2-10). The top section includes a list of the bootable partitions and a button for changing the boot loader to LILO (or for not enabling a boot loader at all).
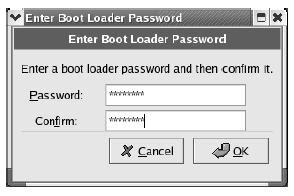
The middle block of this configuration screen allows you to select whether you want
to enable password protection on the boot loader. You want to enable this to prevent
 Figure 2-10 Configure the GRUB boot loader to boot Linux.
unauthorized access to the boot settings, so click the check box, which will bring up the
password box as shown.
 The check box in the last section of the boot loader configuration screen allows you to set
somewhat more esoteric features of the boot loader. If you check the box and click Next, you
will get an advanced configuration screen (see Figure 2-11).
GRUB sets up on the master boot record (MBR) or the first partition on which Linux resides. The MBR is the very first thing the system will read when booting a system. It is essentially the point where the built-in hardware tests finish and pass off control to the
 Figure 2-11 Set the boot loader’s location and pass parameters to the kernel.
software. This is the default; if you allow GRUB to be installed here, its graphical boot menu will load when you power on or reboot your system, and it will allow you to select which operating system to load. In a server configuration, there may be choices of Linux kernels to load, but there should just be one operating system option!
password box as shown.
 The check box in the last section of the boot loader configuration screen allows you to set
somewhat more esoteric features of the boot loader. If you check the box and click Next, you
will get an advanced configuration screen (see Figure 2-11).
GRUB sets up on the master boot record (MBR) or the first partition on which Linux resides. The MBR is the very first thing the system will read when booting a system. It is essentially the point where the built-in hardware tests finish and pass off control to the
 Figure 2-11 Set the boot loader’s location and pass parameters to the kernel.
on the first sector of the root partition. This will allow your preferred boot loader to run first
and then pass control off to GRUB, should you decide to start Linux. Figuring out how to notify
your preferred boot loader that there’s a new operating system available is up to you. This screen also has an option to Force LBA32, which uses linear mode. This applies only to some SCSI drives or drives that are accessed in LBA mode, so unless you know that it applies to you, or are experimenting, leave the box unchecked.
The last option on this advanced configuration screen is a box that allows you to enter kernel parameters to be used at boot time. Most people can ignore this box. If the documentation for a particular feature or device requires you to pass a parameter here, add it; otherwise, leave it blank.


No comments:
Post a Comment